Tag Archive for: fifa tutorial

100k-500k TRADING GUIDE

Method 1 – Rash Investing

This is a insanely good method as you can x2-x5 your coins in the matter of seconds/minutes BUT you have to be on instantly to buy from my calls that i post the time frame to buy is so quick you have to buy instantly.

METHOD EXPLAINED So go onto fifa and at 6 instantly ASAP go check the new sbc’s thats out and see if it’s any good and will have demand then monitor the sbc requirements to complete it then you have max 30 seconds to buy who you think will rise because of the sbc.

EXAMPLES For example if the sbc needs ie. 1 nation max and has positions like LM/RM/ they will rise most from nations like Argentina who are RM/LM as those positions do best and CB’s.

Things to note – You have to be insanely quick to react and buy – Be confident. If you think a certain player will rise go for it! – Some players you buy won’t rise but that happens take the loss and move on I will post every day at 6pm if there’s any rash invests to buy so don’t worry but i want you to understand this guide because some days i’m not online at 6 so you will have to make calls and buy players yourself.


Method 2 – Sniping

Sniping is were you find popular players & inflated players and snipe for ~10% below their price! For example if someone is 2k you would snipe for 1,800 and make 100 coins profit per card!

Video guide:


Method 3 – Solution Trading

Solution trading
– daily sbc’s come very often during fifa & even more often due to the World Cup this means that the demand for players than are used in the top solution (the cheapest) will start to rise because of the insane demand of people trying to do the sbc’s So this means soliton players fluctuate crazily when their low = not in a solution you buy and then wait till he’s in top solution again and boom he’s high again.

So make a huge list of players that are getting into top solutions and rising and buy them at their low point and sell at the high (fluctuations) using futbin graphs.

You can also do another method with solutions – keep refreshing the solutions for a sbc and when a new top solution comes buy the players in the solution who are going to rise (check my solution trading player list) then sell as more people start to use the solution.

INFO – Don’t get too greedy as players drop fast when solution goes. – Don’t go all in if your new to solution trading just start by buying a few not loads until you get the method. – This is the most profitable method so please read this carefully! – And good luck!

Solution player examples:
Townsend
Smith Rowe
Bowen
Diop
Gil
Wolf
Odoi
Pino
Terrier
Dawson


HIGH BUDGET TRADING IN FIFA 23!

METHOD 1 : PROMO OOP TRADING

What is oop? When a certain card of that player goes oop. In this case with promo cards they go oop when the promo ends. When the card goes oop the supply of that cards drops because people can’t pack it no more and if the demand is still there/stays the same the card will rise as the demand outweighs the supply.

Best time to buy During lighting rounds for that promo deals will come about so you want to buy at the cheapest price they have been while in packs.

My favourite promos Totw oop investing is my all time fav as you can do it every week and it ends on Wednesday so theres no new proper promo coming straight after which will cause panic.

Risks Say there’s a new promo coming straight after that card going oop if there’s a card in that promo thats a better replacement than that card the card will drop in price but will rise if there’s no cheaper/better replacements. Luckily we have leaks now so we can judge whether there will be replacements.

METHOD 2 : FLIPPING

Flipping is trading of fluctuations of cards. The card needs demand to have fluctuations. It will have fluctuations because some hours people are buying and some their not. Cards need to fluctuate enough for profit ao around 12% fluctuation throughout the day is perfect.

How to do it? So you wanna buy at the lowest point of fluctuation tat card goes to then immediately list for the high price and keep relisting so yu atc the spike rater than keep watching the price of the card. And you might get a lazy buyer.

Key times

6-8pm is the best time to buy as depending on content the market can go down due to promo packs etc and brings good snipes and bidding becomes good.

8-12pm the cards start to rebound if there’s no major panic in the market.

12pm-5am market dips due to eu sleeping normally a great time to buy in the dip then sell when eu wakes up (5am-11am)

How to use Camera Raw

Camera Raw can enhance your image a lot and is a very powerful tool, but most of the time, it could be used to its true potential.
In this article, I will show and tell you how you can use the tool to increase the quality of your final edits as well as massively
as player renders.

If you would like to follow along with this tutorial, please download the following file:

Camera Raw is very powerful, but it can only do so much. How the render is lighted, and the colours of the original renders also play a big part in the outcome. So you want to make sure you choose an excellent render for your card or edits. Here are some examples of good and bad renders.

Not a good render

This Martinelli render has harsh shadows in the face and a big difference in lighting, making it hard to apply one camera filter that makes the entire face look good. Some parts of the face are also overexposed, making the face lose precious detail.

A good render

This Mason Mount render is perfect for Camera Raw; there is a lot of orange in his face (A good thing), but the orange is not oversaturated or just too much, and the face is lit uniformly, giving us more freedom.

Camera Raw Basics

When opening up Camera Raw, you are shown a wide array of options, groups, effects and more, so it could be easy to lose track of what options do what. And some options might look like they do the same thing, but in reality, they adjust values differently. Before you start, make the render a smart object so you can go back and edit the image later.

This render is a bit bland, and therefore the right thing to do is to increase the contrast of it to make it pop more. A good idea is to increase the highlights and exposure very slightly to make it pop even more. In some cases, you might want to bring down the shadows of the render to create even more contrast. Increasing the highlights and shadows, in many cases, creates more realistic contrast because the contrast slider also affects the colour saturation.

Basic Adjustments

The specific adjustments of a render can change depending on the render. As you can see in the video, instead of increasing the shadows I decreased them. If you want to you can also add texture to the render, I did not see the need for this one because it already had lots of detail.

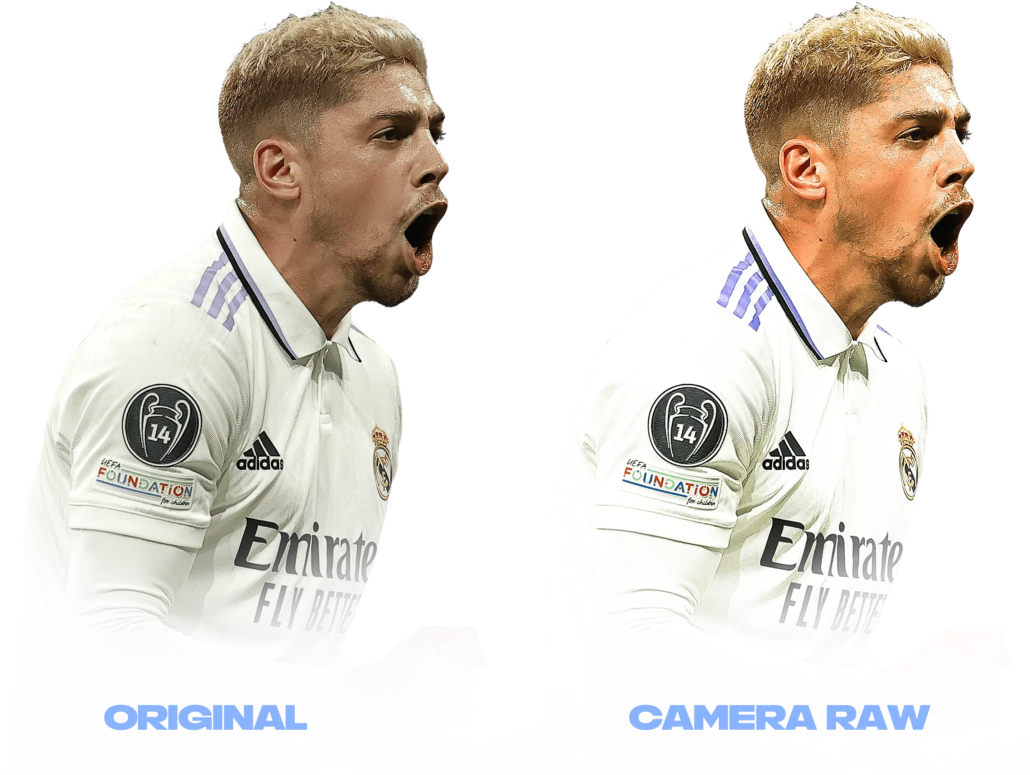
Next up is the curves, here is where the most of lighting changes are made since they make it pop a lot more than the lighting options in the basic group. Here you can follow what I did to the Valverde render on your own renders or try it out for yourself to see what looks best. Just keep in mind not to do too much; just small changes should be made as this is most likely not the final camera raw change you will make on the render and adjusting it too much will make the render look unnatural. What we are going for is a natural look but making it pop more.

As you can see, I also added a bit of sharpening to make the render look like it has a bit more detail. This is primarily noticeable and looks good if you shrink the render down and put it in a card.

Adjusting the colours is very important so the render looks good and has the right amount of yellow, oranges, reds etc. What I’ve done here is change the orange hue slightly to be more red. That’s more of a personal preference, but it looks better and more natural with a bit more of red rather than yellow. I also increased the orange saturation to make it pop more, as well as increased the orange luminance. Here is also the place to adjust the kit colours if you have lost some of the saturation of darkness from the previous steps.

Final Product